Pretzel Dogs - a love story

The words were still leaving my cousin's lips when I turned to my fiancé and said, "We have to, I need to taste that."  

Several days after Christmas we were with yet another group of family members, and my cousin began telling us about a new place downtown where everything was made into a pretzel.  Stuffed pretzels, pretzel pizzas, pretzel calzones (I died) and...pretzel-wrapped hot dogs.  

Pretzel Dogs with Smoked Gouda & Beer Dip {Pedantic Foodie}

Now, you know that I'm a highly snobby, slightly pretentious food snob, but I do love and thoroughly enjoy a good hot dog.  It's my #1 guilty pleasure food.   Load it up with sweet pickles and I'm close to fainting with joy.  

So, it is no surprise that when I heard the words "pretzel-wrapped hot dogs" I grabbed my keys and begged someone to help me find this heavenly establishment.  I ordered without hesitation and, after a few, long moments of anticipation, I was holding a bag of happiness.  The greasy, sweet, butter leaked through the brown paper bag and the perfume of freshly baked, yeasty dough consumed my senses.  This was going to be good.  

Pretzel Dogs with Smoked Gouda & Beer Dip {Pedantic Foodie}

I ate it all.  Well, I had to share a little bit with my fiancé, but he got no more than a small bite.  It was everything I had dreamed it would be, and at that moment I knew I was going to create my own version of this delicacy at home. 

The task was really a simple one, and I am no stranger to pretzel-making.  I began by making a batch of my favorite pretzel dough and then waited eagerly for it to rise.  I chose the fancy all-beef, no nitrate hot dogs because that is the only kind I can will myself to buy, but if you would like to go for something a bit more traditional - well, I won't tell. 

Pretzel Dogs with Smoked Gouda & Beer Dip {Pedantic Foodie}

The hardest part of this recipe is wrapping the hot dogs.  It is not overly difficult, but the hot dogs do tend to resist being wrapped up at times.  I dried mine a bit to remove any excess moisture that would prevent the dough from clinging as it should.  

This video shows the simplicity of the wrapping process, as well as my mad dough-rolling skills.  Ha. Haha.  Kidding.  Oh, and that bench scraper is also my highly sophisticated kitchen ruler.

 After the dogs have been swaddled, they are boiled for thirty seconds in a baking soda bath.  The reason for this is threefold.  First, the baking soda will assist with browning and give the pretzels that deep, mahogany color.  Second, the baking soda will also give our pretzels that pretzel-y taste we all love.  Lastly, the boiling will give the bread a lovely, chewy texture.  

Do not even think about skipping this step!  An unboiled pretzel is not a pretzel.  

Pretzel Dogs with Smoked Gouda & Beer Dip {Pedantic Foodie}

After their bath, these pretzels receive a coating of egg wash and a heavy sprinkling of kosher salt. 

I once tried to make pretzels with regular old table salt.  The result was less than pleasing.  It's gotta be the coarse stuff.  

Pretzel Dogs with Smoked Gouda & Beer Dip {Pedantic Foodie}

While the pretzels were baking, I turned my attention to a dip.  The dog I ordered was served with honey mustard and it was fantastic, but I wanted something different.  At the time, I was also thinking that these would make pretty amazing game day food and then I thought of a bunch of guys screaming on the couch, and then I thought of beer and cheese, and then I made this wonderful mess. 

Pretzel Dogs with Smoked Gouda & Beer Dip {Pedantic Foodie}

As soon as the pretzels come out of the oven they are brushed with melted butter to make them just a little bit more wonderful.  

Pretzel Dogs with Smoked Gouda & Beer Dip {Pedantic Foodie}

Portion the dip into little bowls, there is no way around double-dipping when it comes to hot, melty cheese dip.  

Pretzel Dogs with Smoked Gouda & Beer Dip {Pedantic Foodie}

Classically succulent hot dogs enveloped in soft, salty, buttery pretzels.  Could it get any better?  I think not.  


Sincerely, 

Pedantic Foodie


Pretzel Dogs with Smoked Gouda & Beer Dip

pretzel recipe slightly adapted from Alton Brown / makes eight

for the pretzels

  • 1 1/2 cups warm water

  • 3 tablespoons granulated sugar

  • 2 teaspoons kosher salt

  • 1 package active dry yeast

  • 22 ounces all-purpose flour, roughly 4 1/2 cups

  • 2 ounces unsalted butter, melted

  • vegetable oil, for greasing

  • 8 all-beef hot dogs

  • 10 cups water

  • 2/3 cup baking soda

  • egg wash (1 egg yolk beaten with 1 teaspoon of water)

  • course-ground kosher salt or sea salt

In the bowl of your stand mixer combine 1 1/2 cups warm water, sugar, and kosher salt.  Sprinkle yeast on top and allow to sit for 5 minutes or until foamy. 

Add the flour and melted butter to the yeast mixture and fit your mixer with the dough hook attachment.  Mix on low speed until the flour and butter are well incorporated.  Change the speed to medium and knead until the dough is smooth and begins to pull away from the sides of the bowl.  This will take about 5 minutes.  

Remove the dough gently and place in a large bowl greased with vegetable oil.  Cover with a damp towel and place in a warm place to rise for 1 hour, or until doubled in size. 

Preheat your oven to 450 degrees.  Line two baking sheets with parchment paper.  

In a large, heavy saucepan, combine baking soda with 10 cups of water.  Bring to a rolling boil.  

Turn the dough out unto a floured surface and portion into 8 equal pieces.  Roll each piece of dough into a 15-inch rope.  Wrap the rope around each hot dog, twisting tightly to form a case. 

Place the pretzels in the boiling water, one at a time, for 30 seconds.  Transfer the boiled pretzels to the prepared sheet pans.  Brush each pretzel with egg wash and sprinkle with salt.  

Bake the pretzels until they are deep golden brown, about 10-12 minutes.  While the pretzels are baking, prepare the dip.  

for the dip

  • 2 tablespoons unsalted butter

  • 1/4 cup all-purpose flour

  • 1 teaspoon kosher salt

  • 2 teaspoons ground mustard

  • 1 cup whole milk

  • 1 cup dark beer

  • 3.5 ounces smoked gouda, shredded

  • 3.5 ounces sharp cheddar, shredded

In a large saucepan, melt butter over medium heat.  Whisk in flour and cook, 1-2 minutes, until the flour has just started to brown.  

Whisk in salt, mustard, and milk.  Cook, stirring constantly, for 1 minute, until the milk has thickened, then add the beer.  Cook for an additional 3-4 minutes, until the mixture is smooth and the beer has cooked off slightly.  

Remove from heat and stir in shredded cheeses.

Pour the dip into an oven-safe pan and place under the broiler for 5-7 minutes, until the top has browned.  Serve immediately with freshly baked pretzel dogs.  Enjoy! 

Pear, Bacon, and Brussel Sprouts Warm Salad

The scent of pine and cinnamon floats about the room, I am reading A Christmas Carol by tree-light, presents are wrapped, and the old familiar feeling of Christmas hangs in the air.  

It’s nearly Christmas and as I do every year, I find myself wondering what has happened to the many foregone hours, days, and weeks of December.

Pear, Bacon, and Brussel Sprout Warm Salad {Pedantic Foodie}

The family will soon be arriving, and the living room covered in shiny paper and curly ribbons, but there are still a few opportunities to work some kitchen magic.

Pear, Bacon, and Brussel Sprout Warm Salad {Pedantic Foodie}

Pears are to December what apples are to October, and it is time to take advantage of their sweet, juicy flesh.  I love eating pears on their own, but there is something special about the combination of their understated sweetness paired with rich, savory flavors. 

Pear, Bacon, and Brussel Sprout Warm Salad {Pedantic Foodie}

This salad begins in the best way imaginable - with bacon.  Several rashers of thick, applewood bacon are cooked until crisp and then set aside, leaving a frying pan full of flavorful fat.  This is how brussel sprouts are meant to be cooked.

2.jpg

The bacon fat will help our sprouts get brown and crispy.  What do you mean this is not really a salad?  It’s green and it has a dressing - it’s a salad.  Stop complaining, you know you love it.

Pear, Bacon, and Brussel Sprout Warm Salad {Pedantic Foodie}

Once the sprouts are cooked through, the sweet, tangy, balsamic and honey dressing is added along with the sliced pears, bacon, and walnuts. 

Pear, Bacon, and Brussel Sprout Warm Salad {Pedantic Foodie}

Just before serving, a heavy dose of grated parmesan is sprinkled.  

Pear, Bacon, and Brussel Sprout Warm Salad {Pedantic Foodie}

Kale and beets can wait for January.  This is the only salad I am interested in at the moment. 

Pear, Bacon, and Brussel Sprout Warm Salad {Pedantic Foodie}

Take a few moments to read, write, or take a cozy, winter nap before the guests start arriving, and the cousins start quarreling.  Merry Christmas. 

Sincerely, 

Pedantic Foodie


Pear, Bacon, and Brussel Sprouts Salad

serves 6

  • 3 rashers applewood-smoked bacon, diced 
  • 8 ounces brussel sprouts 
  • 2 1/2 tablespoons olive oil, divided
  • 2 tablespoons honey 
  • 1/2 tablespoon balsamic vinegar
  • 1/2 teaspoon salt 
  • 1 teaspoon dijon mustard 
  • 3 medium pears, cored and sliced thickly 
  • 1/2 cup toasted walnuts 
  • 1/4 cup parmesan 

Place bacon in a large frying pan and fry over medium heat.  Cook, stirring often, until the bacon is crisp.  Remove from heat and use a slotted spoon to collect the bacon.  Place on a paper towel and set aside.  

Prepare the brussel sprouts by slicing the ends off each sprout with a paring knife.  Peel away the outer leaves, and halve each sprout.  

Place the brussel sprouts in the frying pan, along with the bacon grease and 1 tablespoon olive oil.  Cook, over medium heat until the sprouts are deep brown and crisp on the edges and the centers are tender when pierced with a butter knife.

While the sprouts are cooking, prepare the dressing.  In a small bowl, combine remaining 1 1/2 tablespoons olive oil, honey balsamic vinegar, salt, and mustard.  Whisk to combine.  

Pour the dressing over the cooked brussel sprouts and add pears.  Cook for 1-2 minutes.  

Toss in cooked bacon, walnuts, and parmesan.  Serve immediately.  Enjoy!

Thanksgiving Leftovers Become Roasted Pumpkin Soup

The Christmas decorations are up, the leftover turkey is (sadly) almost finished, and you are left with the remnants of your Autumnal adornments.  All those lovely pumpkins have been exchanged for shiny tinsel and dazzling glass orbs.

Roasted Pumpkin Soup {Pedantic Foodie}

Although those gourdeous (heehee, see what I did there?) adornments are behind us, that is not to say that they have lost their usefulness.   

The solution to most of life's problems is cookies.  The solution to the rest of them is soup.

Roasted Pumpkin Soup {Pedantic Foodie}

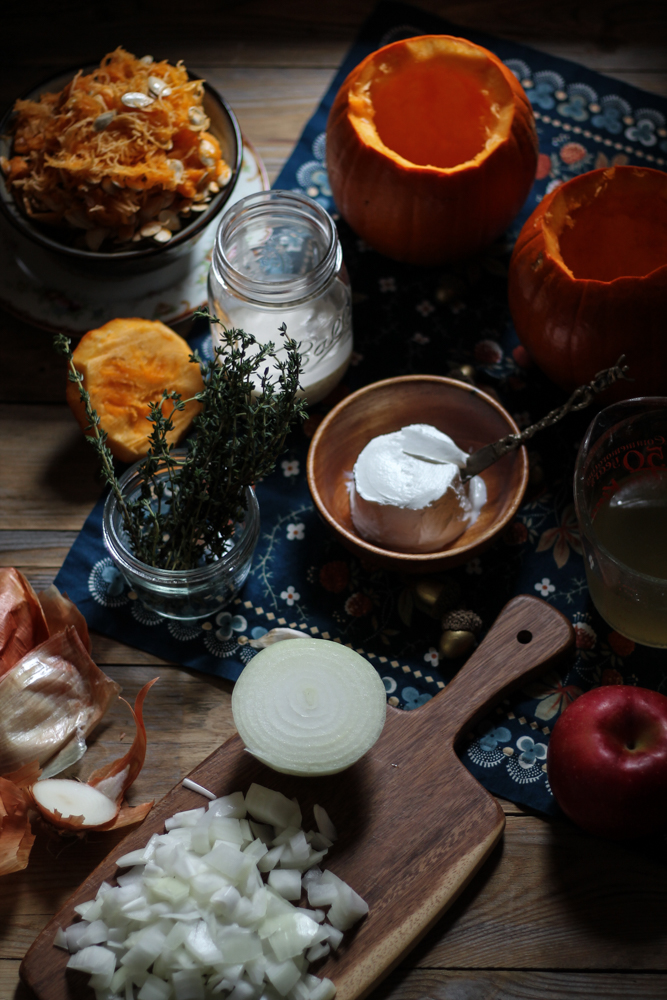
For some time now I have had this pumpkin soup recipe on my ever-growing recipes-to-try list.  It peaked my interest, because unlike most gourd-based soup recipes, this soup is actually baked inside the pumpkin.

Roasted Pumpkin Soup {Pedantic Foodie}

Our pumpkins need to be cleaned and gutted before we fill them with all sorts of deliciousness.  Creamy goat cheese, crisp apples, fresh thyme, onions, salt, chicken broth, butter and cream combine to form the base of this rich bisque. 

Roasted Pumpkin Soup {Pedantic Foodie}

The pumpkins are baked until the flesh is tender, then the sides are gently scraped to remove the soft, flavorful meat.  An immersion blender is very helpful at this point because it allows us to puree the pumpkin directly into that rich, flavorful broth we have created. 

Roasted Pumpkin Soup {Pedantic Foodie}

You may choose to ladle the soup into individual bowls, or serve it in its more natural vessel.  Either way, the flavors of the season will fill your senses.  

Roasted Pumpkin Soup {Pedantic Foodie}

This is the last stand for these final fruits of autumn, and it’s a beautifully flavorful one.

Sincerely, 

Pedantic Foodie


Roasted Pumpkin Soup

recipe slightly adapted from Alton Brown / serves 4

  • 1 whole medium pumpkin (4 lbs) or two smaller pumpkins (1.5-2 lbs)
  • 2 teaspoons olive oil 
  • 1 tablespoon unsalted butter
  • 1/2 small sweet onion, diced 
  • 1 teaspoon salt 
  • 1 clove garlic, minced
  • 1 small apple (any crisp, sweet variety will do) peeled, cored, and cut into 1/4 inch cubes 
  • 1 cup chicken broth 
  • 1/2 cup heavy cream
  • 2 ounces chevre 
  • 1 teaspoon fresh thyme leaves

Preheat oven to 375 degrees. 

Use a sharp knife to cut a lid out of your pumpkin(s).  Cut around the stem at an angle to form an opening several inches wide.  Use a heavy spoon to scrape away the seeds and fibers from the inside of the pumpkin.  Be thorough with this step, as you do not want stringy pumpkin floating around in your soup.  Grease a large, high-sided, oven-safe dish with olive oil and place pumpkins inside. 

Fill the pumpkin(s) with butter, diced onion, salt, garlic, apples, chicken broth and heavy cream.  If you are working with two pumpkins, divide the ingredients evenly between the two.  Cap each pumpkin with its lid and brush with olive oil.  Bake for 1-1/2 hours, depending on the size of your pumpkin(s).  Remove when the skin has begun to deepen in color and the flesh is fairly tender when poked with a fork, but not fully cooked. 

Remove the lid(s) and add thyme and chèvre.  Return to the oven and bake for an additional 30 minutes, then allow to cool for 10-15 minutes.  

Use a large spoon to gently scrape some of the pumpkin flesh into the soup mixture.  Be careful here!  You want the walls of the pumpkin to stay intact.  Do not scrape away all of the flesh, otherwise the pumpkin could collapse.  Use an immersion blender to puree the soup until smooth, being careful to not blend too close to the sides or bottom of the pumpkin, as the blender could tear the skin. 

Serve immediately.  Enjoy! 

*Unfortunately, not every pumpkin on your mantle or dinning room table will make for a toothsome soup.  The large, tough pumpkins you would use for carving are not ideal for cooking.  However, Sugar Pie pumpkins or even Cinderella pumpkins are both just as appealing to the eye as they are to the palate.